
Finding That “Perfect Light”
One of the hardest things to understand as a young photographer is the concept of “good light”. Other photographers will often throw phrases at you like “High Sun!” or “Backlit!”. You’re going to want to learn light as quickly as possible as it will make a dramatic change in the quality of photographs you are able to capture. Luckily, there is an app for that!
SunCalc is app that can help you accurately measure the sun’s angle right on the internet. Once you get comfortable with how to use it, you will know exactly how and when you can take incredible photographs, with awesome light. Check out these examples where SunCalc helped me capture that perfect light.
So I wanted to capture a train coming around this cool curve at Oroville. I wanted light on both the front and side of the locomotive, so I knew I needed a good light angle. I went on to SunCalc.com to see when the light angle would be the best. I selected the date I was shooting, which happened to be January 20th, 2014. Then, using the sun slider at the top of the page, I moved the sun angle. After playing with the slider for a few minutes, I found the perfect angle. I marked down the “perfect” time along with the bookends of “good” time. You’ll learn quickly that a train won’t always show up right at the “perfect” time.
My “perfect” time ended up being right about 15:45 (3:45pm) but I knew I would get a pretty nice shot anywhere between 15:00 (3pm) and 16:30 (4:40pm).
Early bookend (15:00)

Perfect Timing (15:45)

Late bookend (16:30)

So I packed up my gear and headed trackside for the afternoon. I ended up getting very lucky as a MOW (Maintainance of Way) work window was just clearing up, meaning a backlog of trains were headed my direction. The first train came at 16:11 (4:11pm), right in my window of “good light”. I think the light this shot turned out very nice. What do you think? (Let me know in the comments below.)
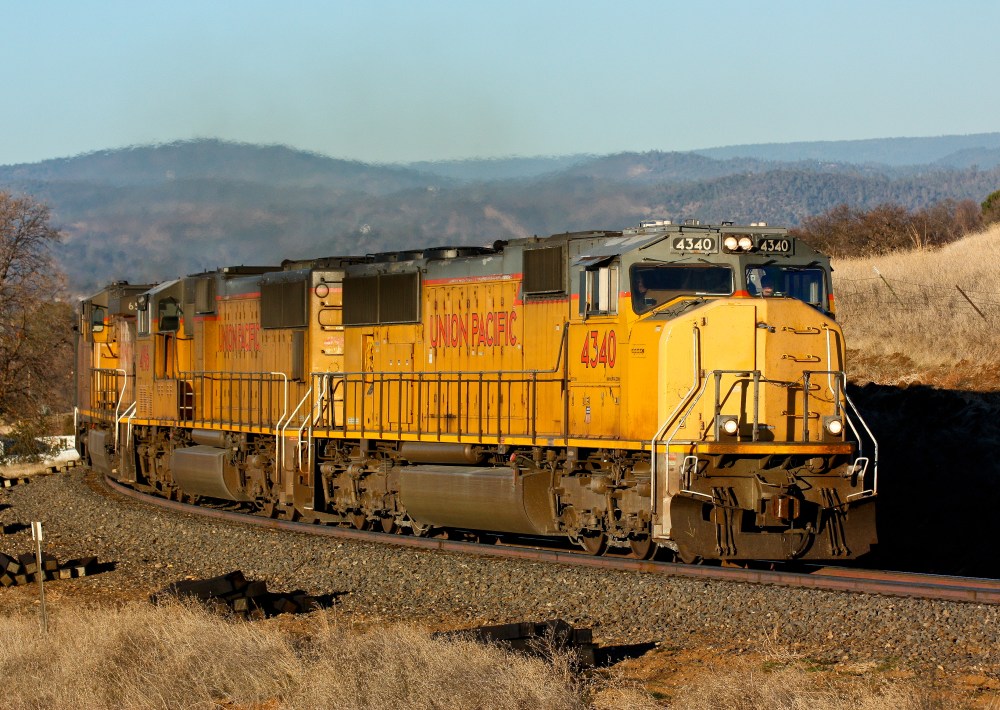
An ethanol train from the midwest rumbles through Oroville, California with the Sierra Nevada Mountains providing the backdrop.
We’ve All Shot In Bad Light
I’ve certainly done it. A number of times in fact. Now my reasoning varies from “I’ve never been to this location before so I’ll shoot everything I see” to “This train is just too cool not to photograph”. And at the end of the day, shooting in bad light is fine, if you want to “document” whatever it may be. . But when you want to take your photography to that next level, you’ll need to be shooting in good light.
Here are some shots I’ve taken in bad light. Notice how in the first shot, the nose (front) of the locomotive is completely in shadow. That is not very attractive considering the photograph really does feature the nose. Now check out the second shot. The side of the locomotive is dark because of shadows. Again, not very attractive to the eye!


To avoid taking shots like these, use the SunCalc like I did in that first shot. Once you become more comfortable out in the field, you will learn how to quickly “read” light, and SunCalc won’t be needed as often. But until then, use SunCalc and capture that train in perfect light!
What About High Sun?
Now you might be wondering, how can SunCalc help me with “High Sun”. Well first you’ll have to understand what exactly “High Sun” is. If someone says, “that shot has high sun”, they are saying the sun was at an extreme angle, causing bad shadows across your train along with overall unattractive light. High sun is usually only a problem during the summer months when the sun passes overhead around 1pm. This graphic might help you understand sun angle.
Here is an example of a shot taken during a high sun time vs a shot taken during late afternoon light. Look at the difference light makes!
High Sun

Late Afternoon Light

“Well how can SunCalc help me with high sun?” I have a general rule which seems to work well when trying to figure out if I’ll be shooting in high sun or not. If the angle line (in SunCalc) is less than half of what the sunrise/sunset line is, then you will be shooting in high sun. Let me show you what I mean using the following example.

Notice how the orange line is about half the length of the yellow line? That means high sun will be starting right about 11:00am this time of year. Generally, anything shot before 11:00am will not be affected by high sun, while anything shot after 11:00am will probably be affected by high sun. Now of course, there is a big difference between shooting at 11:01 and at 1pm (when the sun is at its highest angle this time of year), but it gives you a general time frame to work with. If I were to go shoot around Chico on August 9th, 2014, I would want to spend my time shooting trains between sunrise and 11:00 and then from 3pm to sunset. This would allow me to rest during the period of bad light and focus all my energy when there is good light.
Can you see the unattractive light in the following shot? Notice how the sun angle has created very unattractive shadows on the side of this train. Also notice how the rail is completely covered in shadow. These two clues, along with the overall look of the picture tell me this was taken during high sun. Could you imagine how nice it would have looked in good light?

Do Not Be in Denial
It is hard to accept as a young photographer that you have to wake up early and stay up late for good light. In an ideal world, the best light would come during the middle of the day, allowing us to sleep in and then get home for dinner. But getting yourself out during the best light of the day is crucial if you’re wanting to take your photography to the next level. Capturing an awesome scene is only “good”, capture an awesome scene in amazing light is “great”.
So get yourself out there! Get up early, rest during high sun, and then capture more amazing content as the day draws to a close. If you capture something “great”, I would love to see!
How about you? What are tricks for calculating “great light”? Which photo of yours do you think has the best light? Let me know in the comment below.
Click Below and Share This!


