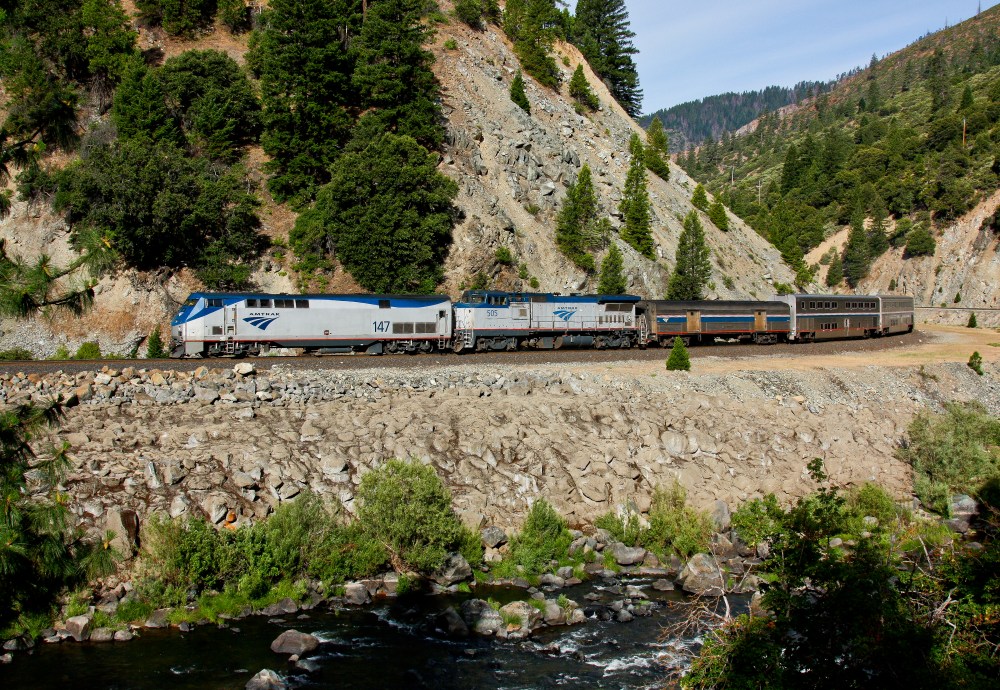
Due to a derailment near Dunsmuir, the northbound Amtrak Coast Starlight made a rare appearance in the Feather River Canyon. Here the train rolls along the banks of the Feather River just east of Belden, California. July 14, 2013.
Summer Time Is Finally Here
This has to be one of my favorite story behind the image as it combines two of my passions: baseball and railroad photography.
In the summer of 2013, most of my time was spent playing baseball. I was a pitcher for Yolo Post 77 which is an American Legion team based in Woodland, California. My primary roll on this team was to be the “closer”, which meant I was in charge of finishing games. But as the season went on, I was morphed into a long reliever and spot starter, while also being “the closer”. I ended up throwing 55 innings throughout the summer for Yolo Post 77 which led the team.
Part of the Yolo Post 77 season is the Doryland Tournament in Chico, California. We were going to spend five days, playing a total of five games against teams from around Northern California. The tournament ended up going very well and the entire team was “living the life of a ballplayer”.
The Twist
But while the team was strictly focused on baseball, I had something else on my mind. Wednesday night I received a text message about a possible derailment at the Cantera Loop near Dunsmuir, California. As more information slowly trickled in that night, it sounded like a number of cars had jumped the tracks right near the Sacramento River. The mainline was blocked and all traffic was stopped.
Quickly, the attention of the rail community veered towards the Amtrak Coast Starlight. This premier passenger train is suppose to pass through the Cantera Loop during the middle of the night, but with the tracks blocked, the trains sat. The southbound train was held in Klamath Falls, Oregon while the northbound train was held in Sacramento, California. Unlike a freight train, you cannot park a passenger train for a few days until the issue is resolved. Therefore, we all knew Amtrak and the host railroads were scrambling to find an idea.
The first rumor that came out was that the passengers on both trains would be bussed between the two points. Each train set would then be turned around and take the passengers to their final destinations. But unfortunately for Amtrak, they could not find enough buses capable of hauling all the passengers on both trains. Therefore they had to revert to plan B.
There are two ways to travel by rail from Sacramento to Klamath Falls. The first way is the one we have already discussed and is known as the “Shasta Route”. This would take the Coast Starlight on its normal trip via Chico, Redding, and Dunsmuir. But then there is the other way; Via the Feather River Route and Inside Gateway.
This route would take the train through the spectacular Feather River Canyon before splitting off at the world famous Keddie Junction and heading up BNSF’s Inside Gateway. During the early morning hours of June 14th, 2013, Amtrak prepped its train to travel via this route.
Time to “Get The Shot”
I woke up early on the morning of June 14th, 2013 and checked my phone. It was on. The Amtrak Coast Starlight was headed for The Canyon.
My dad was quickly awake and we quickly packed up the car. The northbound train was already through Oroville so we knew we would be playing “catch up” through a lot of the canyon. After grabbing McDonalds to go, we were on our way, trying to catch up as fast as we could.
I still remember when I first saw the train. It was just east of Belden, California in an area know to railroad photographers as Serpentine Canyon. The stainless steel cars were shining bright in the early morning sun as they rounded in and out of curves along high cliffs above the Feather River. My focus was now on capturing some of this morning glory.
A lot of things go through your mind when trying to pick out a location for a photograph. The first thing I always look at is the light. Without good light, I have nothing to work with and won’t be able to capture usable content. The next thing is composition. If I can’t find a spot that visually makes sense, there is no point in even stopping the car. Once a location passes the first two tests, I have to figure out the logistics. Is there a safe place for me to be while taking the picture? Is there a safe place for the car? What lens will I need to capture the scene correctly? What are the optimal settings on my camera? Will stopping at this location potentially jeopardize a better shot a little farther down the line? Lets just say, a lot of things go through your mind and it is not always easy to make the correct decision when you have a train only seconds behind you.
Luckily for me, years of experience have made my judgement very good. Most of the time I don’t really have to “think”, I just see it and react by pointing to my dad where I want to go. From there, I jump out of the car and run to the exact spot to capture the image. This type of photography is hard and can lead to a lot of mistakes, but it is also necessary and very exciting.
So that’s the story. The image above was created by large amounts of luck and a split second decision. After I took this image, I continued to chase the Coast Starlight to Keddie where I captured some more incredible content. Later on in the day, I was able to shoot a number of images of the southbound Coast Starlight as it traversed the Feather River Canyon.
Reflecting back, I realize how lucky I was to be able to capture the images that I did. This was the first time the Coast Starlight detoured via the Feather River Canyon and I just happened to be an hour away in Chico, California for a baseball tournament. There is no way I would have been able chase these trains if I was anywhere else. They also just happened to detour on a day where we didn’t play till late at night. Lastly, they detoured over a line I was familiar with and one I was comfortable chasing. All the stars just happened to line up and I was able to take advantage of it. It was an awesome day.
What about you?
Have you ever had a crazy experience while traveling with Amtrak? Will you ever ride with Amtrak again? Let me know in the comments below.
Click Below and Share This!